Organizing Your Android Development Code Structure

Writing a medium to large Android app requires having code structure. In creating our latest Android development project, I came across a lot of problems handling the structure and then I searched and found a simple way of structuring as below that helped me out.

Java Code

I like to have separate files for each class in my Android projects, the only exception being AsyncTasks. Having this many java files means you have to have more packages than the base package. I ended up with a package for each type of main class. Each class is named ending with its type.

com.example

activities

Contains all the activities. Classes are all named with Activity at the end. That way, you can immediately know what it is when reading Java code that doesn’t have its full package name.

adapters

Contains all the adapters.

authenticator

Contains any class related to signing a user in. I create a local account and having all related classes together is very handy.

data

Contains all classes related to data management such as ContentProvider and SQLiteHelper.

data.migrations

Contains all of my SQLite migrations. I created a class for migrations, read about it here, and put them all in this package.

fragments

Contains all fragments.

helpers

Contains helper classes. A helper class is a place to put code that is used in more than one place. I have a DateHelper for instance. Most of the methods are static.

interfaces

Contains all interfaces.

models

Contains all local models. When syncing from an HTTP API I parse the JSON into these Java objects using Jackson. I also pull Cursor rows into these models as well.

preferences

Contains all classes for custom preferences. When creating the preferences I required a custom PreferenceDialog as well as a custom PreferenceCategory. They live here.

sync

Contains all classes related to syncing. I use a SyncAdapter to pull data from an HTTP API. In addition to the SyncAdapter a SyncService is required, so I created a package.

Layouts

The layouts folder can easily become disorganised since you can’t have any folders in it. This is a known issue and has been ignored for 4 years now. To get around this I name my layout files with a prefix depending on what they are for. This sorts them together in the android studio file listing.

R.layout

activity_

adapter_

fragment_

IDs

All of my IDs are snake_case. I had a project that was inconsistent with how IDs were named and it was a pain. Many projects seem to do mixedCase notation for IDs, but it seemed weird having the different styles in Java code depending on what type of resource it was, e.g. R.layout.snake_case vs R.id.mixedCase.

Values

For values I have a separate file for each type of resource, e.g. dimens.xml. This works out well for most of the values, except for strings. There are a large amount of strings in this app and having them all in the same file is pretty unusable. In this case I split out some of the strings into groups by their activity. This allows you to easily find a string if you’re looking at the activity already.

How do you structure your code for Android app development projects? Is there any better way to follow? Comment and let me know.

Android 5.0 features you need to know about.

Google’s latest update to its Android operating system delivers a ton of new features. Here are the tips and tricks you need to know about.

Google recently released Android 5.0 Lollipop, the largest Android update to date. The updated version of the popular mobile operating system is slowly making its way to older devices. Here are the new features in Android 5.0 Lollipop that you need to know about.

The new Material Design

The first thing you will notice after updating to Android 5.0 Lollipop is the redesigned interface. Google’s “Material Design” brings a cleaner, lighter look to the operating system.

materialistic design

materialistic design

A new lock screen

Notifications are now displayed directly on your device’s lock screen.

lock screen

lock screen

Hide sensitive content in notifications

Not a fan of having everything front and center? Notifications can be disabled or set to hide sensitive content.

Get longer battery life with battery-saver mode

A new feature in Android 5.0 Lollipop promises to squeeze 90 extra minutes of juice out of the battery in your device.

To enable the new battery-saver feature, enter Settings, click on Battery, tap the Menu button (that three vertical dot icon in the top right corner) and select Battery saver.

Hang a Do Not Disturb sign

The first time you change the alert volume on your device you will notice few new options just below the volume slider. These are part of a new featured called Priority mode.

Selecting “None” will disable all notifications, even your alarm clock. While “Priority” mode will show only notifications you have approved. Head to Settings, click Sound & Notifications and select Interruptions to approve select notifications.

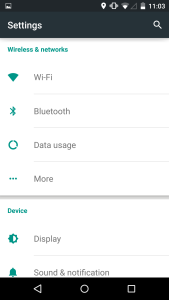
You can now search Settings

Can’t find what you want in the Settings menu? Android 5.0 Lollipop now includes a search option specifically for settings.
search settings

search settings

Add Trusted Devices

You can set a Bluetooth or NFC tag as a “Trusted Device.” When the device is in range of your phone, the security passcode or pattern won’t be required to unlock it. To set this feature up, head to Settings, select Security, followed by Smart Lockand Trusted Devices.

Note that the Smart Lock option will only be available if a security lock, such as a pattern or a passcode, is enabled on your device.

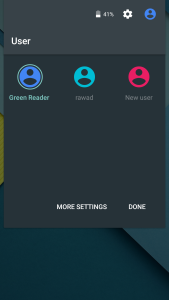
Use guest mode with friends

Share your phone with friends or family members? You can now create multiple user profiles to keep your personal apps, contacts and photos separate from theirs. There is also a guest mode for temporary users. New modes can be accessed and created by pulling down the Notification menu and tapping the person icon in the top right corner of the screen.
multiple users

multiple users

Keep apps Pinned

There are other options if you don’t want to enter guest mode every time you let someone play a game or use the dialer app. A new feature in Android 5.0 Lollipop lets you pin a specific app to the home screen.

The feature isn’t enabled by default, but you can turn it on by going to Settings, clicking on Security, selecting Screen pinning and tapping the On button.

To pin an app, tap on the overview button (it’s the square button along the bottom of your screen) and bring the app you want to pin to the front of the screen. At the bottom-right corner of the app overview will be a blue pin button. Tap on it and confirm the action. To unpin the app, press and hold the back button and overview button at the same time.

Access the improved Quick Settings

The Quick Settings menu in Android 5.0 Lollipop has been improved. There is now a slider so you can quickly adjust the brightness, an rotation lock option and a built-in flashlight, among other features.

You will see your alerts when pulling down the notification menu with a single finger. In order to reveal the Quick Settings menu from here, simply swipe down again with a single finger.

quick settings

quick settings

Quickly check your data usage

One of the new features in the Quick Settings menu lets you quickly check your data usage. Simply pull down the menu and tap the network icon. It’s as easy as that.

Adaptive brightness replaces auto brightness

Previous versions of Android included an automatic brightness feature, which would automatically adjust your brightness depending on your environment.

The feature has now been replaced with an “Adaptive brightness” mode. This is similar to the auto-mode, but you still have the ability to choose your own brightness. Once you have set a base brightness, the adaptive mode will then adjust it based on your surroundings.

Improved performance

One feature you won’t see on the surface of the Android 5.0 update is the move to the new Android Runtime, known as ART.

In short, the new runtime improves the performance of your device and helps optimize battery life.

High contrast text makes it easier to read

A new (and experimental) feature in Android 5.0 aims to make text easier to read. A high-contrast text mode can be enabled by going to Settings and clicking on Accessibility.

You can invert colors

You will also find an option to Invert Colors in the Accessibility settings. While it’s not for everyone, this option can also make it easier to read text at night.

Apps will remain in Overview after a restart

Did you know that apps in the Overview menu will stay in there even after you power down or restart your phone? It’s true, and it makes it easier to get back to the apps you were using.

Use ‘OK, Google’ everywhere

While you still can’t use the “OK, Google” command when the display is off (unless you own a Nexus 6, Moto X or Nexus 9), you can now use it inside of most apps on Android 5.0.

This can be enabled by going to Settings, clicking on Language & Input, followed by Voice input. Then, tap the Gear icon, click on “OK, Google” Detection and enable Google Now from any screen. You will have to train the feature by saying “OK, Google” three times, but once it’s complete you can then use the command from inside of most apps and on any screen.

After you plug your phone in, it will give you an estimate on how long it will take the battery to be fully charged.

google now

google now

More uses for NFC

The Android Beam sharing feature that was first introduced with Android 4.0 Ice Cream Sandwich has been improved with the release of Lollipop. Users could previously only share Web links, contact info, directions and YouTube videos, but now you can share anything with just a tap.

Simply select what you would like to share, place two Android phones with NFC back-to-back, and either tap the screen or choose Android Beam from the sharing menu.

Don’t let notifications interrupt your games

One of my favorite features in Android 5.0 is the new notification system. Notifications will no longer interrupt you when playing a game or watching a movie. Text messages, phone calls and other notifications will now briefly appear at the top of the screen. You can choose to act on the notification or simply swipe it away.

Check your battery stats

In addition to battery improvements, Android 5.0 gives you more information on your battery life. Going to Settings and selecting Battery will give you an estimated time of how much longer your battery will last.

Access Google’s Flappy Bird clone

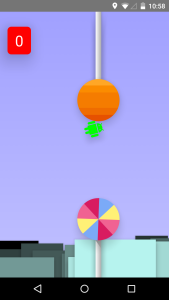
The mobile game Flappy Bird took the world by storm in 2014. After reaching the top of the charts, the game was suddenly removed by its creator from the Google Play Store. As a homage to the game, Google added a Flappy Bird-inspired Android version as an Easter egg in Lollipop.

To access it, head to Settings, click on About Phone and tap “Android version” repeatedly. A lollipop will appear on your screen, a single tap will change the color of the tasty treat, while a long-press will open the game.
flappy bird clone in lollypop

flappy bird clone in lollypop

Vertical SeekBar for Android

Simple customized VerticalSeekBar which extends SeekBar also shows how to customize a view class in java.

/**
* @author hafsalrahman
*
*/
public class VerticalSeekBar extends SeekBar {
    public VerticalSeekBar(Context context) {
        super(context);
    }
    public VerticalSeekBar(Context context, AttributeSet attrs, int defStyle) {
        super(context, attrs, defStyle);
    }
    public VerticalSeekBar(Context context, AttributeSet attrs) {
        super(context, attrs);
    }
    protected void onSizeChanged(int w, int h, int oldw, int oldh) {
        super.onSizeChanged(h, w, oldh, oldw);
    }
    @Override
    protected synchronized void onMeasure(int widthMeasureSpec, int heightMeasureSpec) {
        super.onMeasure(heightMeasureSpec, widthMeasureSpec);
        setMeasuredDimension(getMeasuredHeight(), getMeasuredWidth());
    }
    protected void onDraw(Canvas c) {
        c.rotate(-90);
        c.translate(-getHeight(), 0);
        super.onDraw(c);
    }
    private OnSeekBarChangeListener onChangeListener;
    @Override
    public void setOnSeekBarChangeListener(OnSeekBarChangeListener onChangeListener){
        this.onChangeListener = onChangeListener;
    }
    private int lastProgress = 0;
    @Override
    public boolean onTouchEvent(MotionEvent event) {
        if (!isEnabled()) {
            return false;
        }
        switch (event.getAction()) {
        case MotionEvent.ACTION_DOWN:
            onChangeListener.onStartTrackingTouch(this);
            setPressed(true);
            setSelected(true);
            break;
        case MotionEvent.ACTION_MOVE:
            super.onTouchEvent(event);
            int progress = getMax() - (int) (getMax() * event.getY() / getHeight());
             
            // Ensure progress stays within boundaries
            if(progress < 0) {progress = 0;}
            if(progress > getMax()) {progress = getMax();}
            setProgress(progress);  // Draw progress
            if(progress != lastProgress) {
                // Only enact listener if the progress has actually changed
                lastProgress = progress;
                onChangeListener.onProgressChanged(this, progress, true);
            }
             
            onSizeChanged(getWidth(), getHeight() , 0, 0);
            setPressed(true);
            setSelected(true);
            break;
        case MotionEvent.ACTION_UP:
            onChangeListener.onStopTrackingTouch(this);
            setPressed(false);
            setSelected(false);
            break;
        case MotionEvent.ACTION_CANCEL:
            super.onTouchEvent(event);
            setPressed(false);
            setSelected(false);
            break;
        }
        return true;
    }
    public synchronized void setProgressAndThumb(int progress) {
        setProgress(progress);
        onSizeChanged(getWidth(), getHeight() , 0, 0);
        if(progress != lastProgress) {
            // Only enact listener if the progress has actually changed
            lastProgress = progress;
            onChangeListener.onProgressChanged(this, progress, true);
        }
    }
    public synchronized void setMaximum(int maximum) {
        setMax(maximum);
    }
    public synchronized int getMaximum() {
        return getMax();
    }
}

It can be used from XML as below

<com.hafsal.flag.VerticalSeekBar
        android:id="@+id/calculatorVerticalSeekBar"
        android:layout_width="wrap_content"
        android:layout_height="fill_parent"
        android:layout_gravity="bottom"
        android:max="20"
        android:progress="0" />

Git command to show origin repo

 refer Git Simple Guide.

git remote show origin

git remote show origin displays info for your remote origin repo. I typically use this when I want to get the URL or the remote repo.

sh-3.2# git remote show origin
* remote origin
Fetch URL: /Users/hafsalrahman/Dropbox/Git/testapp.git
Push  URL: /Users/hafsalrahman/Dropbox/Git/testapp.git
HEAD branch: master
Remote branch:
master tracked
Local ref configured for 'git push':
master pushes to master (fast-forwardable)
sh-3.2#


How painless threading with AsyncTask

Whenever you first start an Android application, a thread called “main” is automatically created. The main thread, also called the UI thread, is very important because it is in charge of dispatching the events to the appropriate widgets and this includes the drawing events. It is also the thread you interact with Android widgets on. For instance, if you touch the a button on screen, the UI thread dispatches the touch event to the widget which in turn sets its pressed state and posts an invalidate request to the event queue. The UI thread dequeues the request and notifies the widget to redraw itself.

This single thread model can yield poor performance in Android applications that do not consider the implications. Since everything happens on a single thread performing long operations, like network access or database queries, on this thread will block the whole user interface. No event can be dispatched, including drawing events, while the long operation is underway. From the user’s perspective, the application appears hung. Even worse, if the UI thread is blocked for more than a few seconds (about 5 seconds currently) the user is presented with the infamous “application not responding” (ANR) dialog.

If you want to see how bad this can look, write a simple application with a button that invokes Thread.sleep(2000) in its OnClickListener. The button will remain in its pressed state for about 2 seconds before going back to its normal state. When this happens, it is very easy for the user to perceive the application as slow.

Now that you know you must avoid lengthy operations on the UI thread, you will probably use extra threads (background or worker threads) to perform these operations, and rightly so. Let’s take the example of a click listener downloading an image over the network and displaying it in an ImageView:

public void onClick(View v) {
  new Thread(new Runnable() {
    public void run() {
      Bitmap b = loadImageFromNetwork();
      mImageView.setImageBitmap(b);
    }
  }).start();
}

At first, this code seems to be a good solution to your problem, as it does not block the UI thread. Unfortunately, it violates the single thread model: the Android UI toolkit is not thread-safe and must always be manipulated on the UI thread. In this piece of code, the ImageView is manipulated on a worker thread, which can cause really weird problems. Tracking down and fixing such bugs can be difficult and time-consuming.

Android offers several ways to access the UI thread from other threads. You may already be familiar with some of them but here is a comprehensive list:

Activity.runOnUiThread(Runnable)
View.post(Runnable)
View.postDelayed(Runnable, long)
Handler

Any of these classes and methods could be used to correct our previous code example:

public void onClick(View v) {
  new Thread(new Runnable() {
    public void run() {
      final Bitmap b = loadImageFromNetwork();
      mImageView.post(new Runnable() {
        public void run() {
          mImageView.setImageBitmap(b);
        }
      });
    }
  }).start();
}

Unfortunately, these classes and methods also tend to make your code more complicated and more difficult to read. It becomes even worse when your implement complex operations that require frequent UI updates. To remedy this problem, Android 1.5 offers a new utility class, called AsyncTask, that simplifies the creation of long-running tasks that need to communicate with the user interface.

AsyncTask is also available for Android 1.0 and 1.1 under the name UserTask. It offers the exact same API and all you have to do is copy its source code in your application.

The goal of AsyncTask is to take care of thread management for you. Our previous example can easily be rewritten with AsyncTask:

public void onClick(View v) {
  new DownloadImageTask().execute("http://example.com/image.png");
}

private class DownloadImageTask extends AsyncTask<string, void,="" bitmap=""> {
     protected Bitmap doInBackground(String... urls) {
         return loadImageFromNetwork(urls[0]);
     }

     protected void onPostExecute(Bitmap result) {
         mImageView.setImageBitmap(result);
     }
 }

As you can see, AsyncTask must be used by subclassing it. It is also very important to remember that an AsyncTask instance has to be created on the UI thread and can be executed only once. You can read the AsyncTask documentation for a full understanding on how to use this class, but here is a quick overview of how it works:

You can specify the type, using generics, of the parameters, the progress values and the final value of the task
The method doInBackground() executes automatically on a worker thread
onPreExecute(), onPostExecute() and onProgressUpdate() are all invoked on the UI thread
The value returned by doInBackground() is sent to onPostExecute()
You can call publishProgress() at anytime in doInBackground() to execute onProgressUpdate() on the UI thread
You can cancel the task at any time, from any thread

I highly recommend  to persist tasks across configuration changes and  cancel them properly when the activity is destroyed.

Regardless of whether or not you use AsyncTask, always remember these two rules about the single thread model: do not block the UI thread and make sure the Android UI toolkit is only accessed on the UI thread. AsyncTask just makes it easier to do both of these things.

content source: http://android-developers.blogspot.ae

Some common Linux commands

  • A
    • adduser: Add a user to the system
    • addgroup: Add a group to the system
    • alias: Create an alias
    • apropos: Search Help manual pages (man -k)
    • apt-get: Search for and install software packages (Debian/Ubuntu)
    • aptitude: Search for and install software packages (Debian/Ubuntu)
    • aspell: Spell Checker
    • awk: Find and Replace text, database sort/validate/index
  • B
    • basename: Strip directory and suffix from filenames
    • bash: GNU Bourne-Again SHell
    • bc: Arbitrary precision calculator language
    • bg: Send to background
    • break: Exit from a loop
    • builtin: Run a shell builtin
    • bzip2: Compress or decompress named file(s)
  • C
    • cal: Display a calendar
    • case: Conditionally perform a command
    • cat: Display the contents of a file
    • cd: Change Directory
    • cfdisk: Partition table manipulator for Linux
    • chgrp: Change group ownership
    • chmod: Change access permissions
    • chown: Change file owner and group
    • chroot: Run a command with a different root directory
    • chkconfig: System services (runlevel)
    • cksum: Print CRC checksum and byte counts
    • clear: Clear terminal screen
    • cmp: Compare two files
    • comm: Compare two sorted files line by line
    • command: Run a command – ignoring shell functions
    • continue: Resume the next iteration of a loop
    • cp: Copy one or more files to another location
    • cron: Daemon to execute scheduled commands
    • crontab: Schedule a command to run at a later time
    • csplit: Split a file into context-determined pieces
    • cut: Divide a file into several parts
  • D
    • date: Display or change the date & time
    • dc: Desk Calculator
    • dd: Convert and copy a file, write disk headers, boot records
    • ddrescue: Data recovery tool
    • declare: Declare variables and give them attributes
    • df: Display free disk space
    • diff: Display the differences between two files
    • diff3: Show differences among three files
    • dig: DNS lookup
    • dir: Briefly list directory contents
    • dircolors: Colour setup for `ls’
    • dirname: Convert a full pathname to just a path
    • dirs: Display list of remembered directories
    • dmesg: Print kernel & driver messages
    • du: Estimate file space usage
  • E
    • echo: Display message on screen
    • egrep: Search file(s) for lines that match an extended expression
    • eject: Eject removable media
    • enable: Enable and disable builtin shell commands
    • env: Environment variables
    • ethtool: Ethernet card settings
    • eval: Evaluate several commands/arguments
    • exec: Execute a command
    • exit: Exit the shell
    • expect: Automate arbitrary applications accessed over a terminal
    • expand: Convert tabs to spaces
    • export: Set an environment variable
    • expr: Evaluate expressions
  • F
    • false: Do nothing, unsuccessfully
    • fdformat: Low-level format a floppy disk
    • fdisk: Partition table manipulator for Linux
    • fg: Send job to foreground
    • fgrep: Search file(s) for lines that match a fixed string
    • file: Determine file type
    • find: Search for files that meet a desired criteria
    • fmt: Reformat paragraph text
    • fold: Wrap text to fit a specified width.
    • for: Expand words, and execute commands
    • format: Format disks or tapes
    • free: Display memory usage
    • fsck: File system consistency check and repair
    • ftp: File Transfer Protocol
    • function: Define Function Macros
    • fuser: Identify/kill the process that is accessing a file
  • G
    • gawk: Find and Replace text within file(s)
    • getopts: Parse positional parameters
    • grep: Search file(s) for lines that match a given pattern
    • groups: Print group names a user is in
    • gzip: Compress or decompress named file(s)
  • H
    • hash: Remember the full pathname of a name argument
    • head: Output the first part of file(s)
    • help: Display help for a built-in command
    • history: Command History
    • hostname: Print or set system name
  • I
    • id: Print user and group id’s
    • if: Conditionally perform a command
    • ifconfig: Configure a network interface
    • ifdown: Stop a network interface
    • ifup: Start a network interface up
    • import: Capture an X server screen and save the image to file
    • install: Copy files and set attributes
  • J
    • jobs: List active jobs
    • join: Join lines on a common field
  • K
    • kill: Stop a process from running
    • killall: Kill processes by name
  • L
    • less: Display output one screen at a time
    • let: Perform arithmetic on shell variables
    • ln: Make links between files
    • local: Create variables
    • locate: Find files
    • logname: Print current login name
    • logout: Exit a login shell
    • look: Display lines beginning with a given string
    • lpc: Line printer control program
    • lpr: Off line print
    • lprint: Print a file
    • lprintd: Abort a print job
    • lprintq: List the print queue
    • lprm: Remove jobs from the print queue
    • ls: List information about file(s)
    • lsof: List open files
  • M
    • make: Recompile a group of programs
    • man: Help manual
    • mkdir: Create new folder(s)
    • mkfifo: Make FIFOs (named pipes)
    • mkisofs: Create an hybrid ISO9660/JOLIET/HFS filesystem
    • mknod: Make block or character special files
    • more: Display output one screen at a time
    • mount: Mount a file system
    • mtools: Manipulate MS-DOS files
    • mtr: Network diagnostics (traceroute/ping)
    • mv: Move or rename files or directories
    • mmv: Mass Move and rename (files)
  • N
    • netstat: Networking information
    • nice: Set the priority of a command or job
    • nl: Number lines and write files
    • nohup: Run a command immune to hangups
    • notify-send: Send desktop notifications
    • nslookup: Query Internet name servers interactively
  • O
    • open: Open a file in its default application
    • op: Operator access
  • P
    • passwd: Modify a user password
    • paste: Merge lines of files
    • pathchk: Check file name portability
    • ping: Test a network connection
    • pkill: Stop processes from running
    • popd: Restore the previous value of the current directory
    • pr: Prepare files for printing
    • printcap: Printer capability database
    • printenv: Print environment variables
    • printf: Format and print data
    • ps: Process status
    • pushd: Save and then change the current directory
    • pwd: Print Working Directory
  • Q
    • quota: Display disk usage and limits
    • quotacheck: Scan a file system for disk usage
    • quotactl: Set disk quotas
  • R
    • ram: ram disk device
    • rcp: Copy files between two machines
    • read: Read a line from standard input
    • readarray: Read from stdin into an array variable
    • readonly: Mark variables/functions as readonly
    • reboot: Reboot the system
    • rename: Rename files
    • renice: Alter priority of running processes
    • remsync: Synchronize remote files via email
    • return: Exit a shell function
    • rev: Reverse lines of a file
    • rm: Remove files
    • rmdir: Remove folder(s)
    • rsync: Remote file copy (Synchronize file trees)
  • S
    • screen: Multiplex terminal, run remote shells via ssh
    • scp: Secure copy (remote file copy)
    • sdiff: Merge two files interactively
    • sed: Stream Editor
    • select: Accept keyboard input
    • seq: Print numeric sequences
    • set: Manipulate shell variables and functions
    • sftp: Secure File Transfer Program
    • shift: Shift positional parameters
    • shopt: Shell Options
    • shutdown: Shutdown or restart linux
    • sleep: Delay for a specified time
    • slocate: Find files
    • sort: Sort text files
    • source: Run commands from a file `.’
    • split: Split a file into fixed-size pieces
    • ssh: Secure Shell client (remote login program)
    • strace: Trace system calls and signals
    • su: Substitute user identity
    • sudo: Execute a command as another user
    • sum: Print a checksum for a file
    • suspend: Suspend execution of this shell
    • symlink: Make a new name for a file
    • sync: Synchronize data on disk with memory
  • T
    • tail: Output the last part of files
    • tar: Tape Archiver
    • tee: Redirect output to multiple files
    • test: Evaluate a conditional expression
    • time: Measure Program running time
    • times: User and system times
    • touch: Change file timestamps
    • top: List processes running on the system
    • traceroute: Trace Route to Host
    • trap: Run a command when a signal is set(bourne)
    • tr: Translate, squeeze, and/or delete characters
    • true: Do nothing, successfully
    • tsort: Topological sort
    • tty: Print filename of terminal on stdin
    • type: Describe a command
  • U
    • ulimit: Limit user resources
    • umask: Users file creation mask
    • umount: Unmount a device
    • unalias: Remove an alias
    • uname: Print system information
    • unexpand: Convert spaces to tabs
    • uniq: Uniquify files
    • units: Convert units from one scale to another
    • unset: Remove variable or function names
    • unshar: Unpack shell archive scripts
    • until: Execute commands (until error)
    • useradd: Create new user account
    • usermod: Modify user account
    • users: List users currently logged in
    • uuencode: Encode a binary file
    • uudecode: Decode a file created by uuencode
  • V
    • v: Verbosely list directory contents (`ls -l -b’)
    • vdir: Verbosely list directory contents (`ls -l -b’)
    • vi: Text Editor
    • vmstat: Report virtual memory statistics
  • W
    • watch: Execute/display a program periodically
    • wc: Print byte, word, and line counts
    • whereis: Search the user’s $path, man pages and source files for a program
    • which: Search the user’s $path for a program file
    • while: Execute commands
    • who: Print all usernames currently logged in
    • whoami: Print the current user id and name (`id -un’)
    • Wget: Retrieve web pages or files via HTTP, HTTPS or FTP
    • write: Send a message to another user
  • X and onwaard
    • xargs: Execute utility, passing constructed argument list(s)
    • xdg-open: Open a file or URL in the user’s preferred application.
    • yes: Print a string until interrupted
    • .: Run a command script in the current shell. ### allows you to remark or comment without disturbing the Terminal.

Oracle Java installation procedure on Ubuntu 12.04,12.10,13.04,13.10 and Linux Mint

You will not be able to install the Oracla Java from the official Ubuntu repositories as it is removed due to some Java licence issues.

Here I would like to explain you how to install Oracle Java (JDK) 8, Oracle Java (JDK + JRE) 7 or Oracle Java (JDK) 6 on Ubuntu 12.04 Precise Pangolin, Ubuntu 12.10 Quantal Quetzal, Ubuntu 13.04 Raring Ringtail, Ubuntu 13.10 Saucy Salamander and Linux Mint

The Webupd8 Team created a PPA repository to make it easy to install Oracle Java for Ubuntu and Linux Mint users. So far, the PPA contains Java 6, 7, 8 installer for Ubuntu 13.10 Saucy, 13.04 Raring, 12.10 Quantal Quetzal, and 12.04 Precise.

1> Press Ctrl+Alt+T to open terminal, follow the below steps to get started

2> Before you install it, remove OpenJDK, if you have it installed

$ sudo apt-get purge openjdk

3> Add webup8team repo

$ sudo add-apt-repository ppa:webupd8team/java

4>Update the repo index

$ sudo apt-get update

5> Install Java version that you require

Install Java 8

$ sudo apt-get install oracle-java8-installer

Or, install Java 7

$ sudo apt-get install oracle-java7-installer

Or, install Java 6

$ sudo apt-get install oracle-java6-installer

Git simple guide

I would like to share some basic information about the best and geeky version controlling system I’ve ever used.

What is Git?

GIT is an open-source version controlling system which you can use to maintain code for your project. It helps you to save your project at different versions so that you can retrieve a previous version of your project without any problem

Git allows a team of people to work together, all using the same files. And it helps the team cope with the confusion that tends to happen when multiple people are editing the same files.

The git basics tutorial provides a succinct overview of the most important Git commands.


 Git basic command line commands


git init

The git init command initializes a new Git repository.

Usage

git init

Create an empty Git repository in the specified directory. Running this command will create a new folder called containing nothing but the .git subdirectory.

git init –bare

Initialize an empty Git repository, but omit the working directory. Shared repositories should always be created with the –bare flag.

Central repositories should always be created as bare repositories because pushing branches to a non-bare repository has the potential to overwrite changes.


git clone

The git clone command creates a copy of an existing Git repository.

git clone

Clone the repository located at onto the local machine. The original repository can be located on the local filesystem or on a remote machine accessible via HTTP or SSH.

Usage

git clone

Clone the repository located at into the folder called on the local machine.


git config

The git config command is a convenient way to set configuration options for your Git installation.

Usage

git config user.name

Define the author name to be used for all commits in the current repository. Typically, you’ll want to use the –global flag to set configuration options for the current user.

#To configure the name of the author.

git config –global user.name

#To configure the email address of the author.

git config –global user.email


 Recording Snapshots


git add

The git adds command moves changes from the working directory to the staging area. This gives you the opportunity to prepare a snapshot before committing it to the official history.

Usage

//To stage all changes in for the next commit.

git add . 

Here ‘.’ represents all files in the current directory.


git commit

The git commit takes the staged snapshot and commits it to the project history. Combined with git add, this defines the basic workflow for all Git users.

Usage

git commit

Commit the staged snapshot. This will launch a text editor prompting you for a commit message. After you’ve entered a message, save the file and close the editor to create the actual commit.

git commit -m “commit message”

Commit the staged snapshot, but instead of launching a text editor, use as the commit message.

git commit -a

Commit a snapshot of all changes in the working directory. This only includes modifications to tracked files.


 Inspecting a Git Repository


git status

The git status command displays the state of the working directory and the staged snapshot. You’ll want to run this in conjunction with git add and git commit to see exactly what’s being included in the next snapshot.

Usage

git status

List which files are staged, unstaged, and untracked.


git log

The git log command lets you explore the previous revisions of a project. It provides several formatting options for displaying committed snapshots.

Usage

git log

Display the entire commit history using the default formatting. If the output takes up more than one screen, you can use Space to scroll and q to exit.

git log -n

Limit the number of commits by . For example, git log -n 3 will display only 3 commits.

git log —oneline

Condense each commit to a single line. This is useful for getting a high-level overview of the project history.

git log —stat

Along with with the ordinary git log information, include which files were altered and the relative number of lines that were added or deleted from each of them.

git log -p

Display the patch representing each commit. This shows the full diff of each commit, which is the most detailed view you can have of your project history.


#Thank you all for reading my blog please have a try with what you have learned.

http://try.github.io/